
Being honest, I’m not very proud of this script 🙂 , but I like the Beauty how “Thoughts become Things” ( Idea -> Script )
INTRODUCTION AND DEFINITIONS :
Yesterday, I was thinking about my graduation days how Image Processing in MatLab used to fascinate me! So I thought giving Images a try in Powershell.
Just to see if an Image can be drawn in the Powershell console I did some (A lot!) research and ended up with this script, but before we delve into it its time for some definitions which are following –
WHAT IS A PIXEL ?
A Pixel (a word invented from “Picture Element“) is the basic unit of programmable color on a computer display or in a computer image.
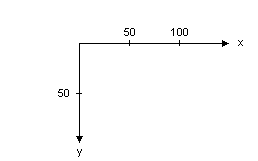
Pixels indicates a color for each image unit along the horizontal axis or row (called the x coordinate) and a color for each Image unit along the vertical axis (called the y coordinate).
![]()
WHAT IS A BITMAP ?
A bit map (often spelled “bitmap”) defines a display space and the color for each pixel or “bit” in the display space.
A Graphics Interchange Format (GIF) and a JPEG are examples of graphic image file types that contain bit maps. Pixels are nothing but color information spread on X, Y coordinates.
Following diagram show the directions in which pixels are spread across X and Y axis.
HOW IT WORKS :
LIMITATIONS :
-
COLORS :
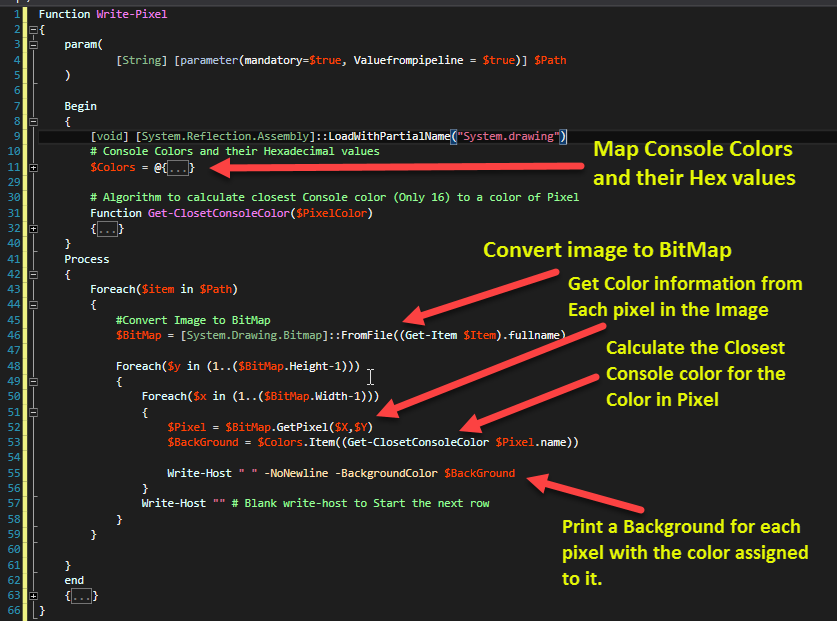
Console is limited to only 16 colors leaving us with less choices. Hence, I have to write a small algorithm to find the Closest console color matching the color in a Pixel.
So you want find the Image in the console very beautiful, but good part is it at least works 😉 -
SPEED :
Speed of drawing Image in a console depends heavily on the number of Pixels in the Image that is width multiplied by the height, so I would recommend that your image size doesn’t cross 150X150 otherwise image will be drawn a pretty slow pace, since the number of iterations will increase drastically for larger images.
NumberOfPixels = Width * Height of the Image
HOW TO RUN :
*This animation is a high speed version of the Original
GET THE SCRIPT :
Grab the script from my GitHub Repo Here
| Function Write-Pixel | |
| { | |
| param( | |
| [String] [parameter(mandatory=$true, Valuefrompipeline = $true)] $Path | |
| ) | |
| Begin | |
| { | |
| [void] [System.Reflection.Assembly]::LoadWithPartialName("System.drawing") | |
| # Console Colors and their Hexadecimal values | |
| $Colors = @{ | |
| 'FF000000' = 'Black' | |
| 'FF000080' = 'DarkBlue' | |
| 'FF008000' = 'DarkGreen' | |
| 'FF008080' = 'DarkCyan' | |
| 'FF800000' = 'DarkRed' | |
| 'FF800080' = 'DarkMagenta' | |
| 'FF808000' = 'DarkYellow' | |
| 'FFC0C0C0' = 'Gray' | |
| 'FF808080' = 'DarkGray' | |
| 'FF0000FF' = 'Blue' | |
| 'FF00FF00' = 'Green' | |
| 'FF00FFFF' = 'Cyan' | |
| 'FFFF0000' = 'Red' | |
| 'FFFF00FF' = 'Magenta' | |
| 'FFFFFF00' = 'Yellow' | |
| 'FFFFFFFF' = 'White' | |
| } | |
| # Algorithm to calculate closest Console color (Only 16) to a color of Pixel | |
| Function Get-ClosetConsoleColor($PixelColor) | |
| { | |
| $Differences = Foreach($item in $Colors.Keys) | |
| { | |
| ''|select @{n='Color';e={$Item}},@{n='Diff';e={[math]::abs([convert]::ToInt32($Item,16) - [convert]::ToInt32($PixelColor,16))}} | |
| } | |
| ($Differences |sort Diff)[0].color | |
| } | |
| } | |
| Process | |
| { | |
| Foreach($item in $Path) | |
| { | |
| #Convert Image to BitMap | |
| $BitMap = [System.Drawing.Bitmap]::FromFile((Get-Item $Item).fullname) | |
| Foreach($y in (1..($BitMap.Height-1))) | |
| { | |
| Foreach($x in (1..($BitMap.Width-1))) | |
| { | |
| $Pixel = $BitMap.GetPixel($X,$Y) | |
| $BackGround = $Colors.Item((Get-ClosetConsoleColor $Pixel.name)) | |
| Write-Host " " -NoNewline -BackgroundColor $BackGround | |
| } | |
| Write-Host "" # Blank write-host to Start the next row | |
| } | |
| } | |
| } | |
| end | |
| { | |
| } | |
| } | |
| #"JSnover.png" |Write-Pixel |
Hoping you’ll find it fun!! 🙂
Prateek Singh
Follow @SinghPrateik

This is really awesome……
LikeLiked by 1 person
Thank you !
LikeLiked by 1 person
That’s fun!
LikeLiked by 1 person
Thank you JSnover 🙂
LikeLike
Dusnt wurk cid
LikeLike
[…] on July 20, 2016 submitted by /u/Prateeksingh1590 [link] [comments] Leave a […]
LikeLike
U RLZ! ^^
true ART of scripting
LikeLiked by 1 person
[…] function/script from Prateek Singh called Write-Pixel. You can find it over at his awesome blog here. Its limited to 16 collors, but within that frame it finds the closest collor to each pixel in a […]
LikeLike